Thursday, December 31, 2009

Carving the neck


I had to figure out how to hold the neck while carving so I took a clamp and screwed it to the work bench.
Here you also see some of the tools I will be using. A draw knife, spoke shave and rasp. I will also be using the wood scrapers and sand paper.
 
I used the draw knife to knock off the corners. I could have gotten by with out the draw knife. I could have used the spoke shave to do this as well. You have to be careful with the draw knife as it will take off as much as or more than you want. If you click on this picture you can see where if you are not careful you can gouge the wood. I decided to stop with the draw knife here.


Here I have started to shape the neck with the spoke shave.


Starting to really take shape.


I use the rasp to rough out the heel.


Then use a scraper and sand paper to smooth it out.


This is where I discovered I made a little mistake. When I rough cut the taper on the back on the neck with the router I brought it down to the nut and I should have stopped at the first fret. This has caused me to have to carve the transition from the neck to the head stock a little differently than I wanted. I am going to take this to my luthier friend Jack and see if he thinks this will effect the strength and the transition point on the neck. What I have figured out is that part of the neck is now .100 or 1/10th of an inch thinner at that point. I figure the worst case scenario is that I end up putting some graphite fiber rods into the head stock from the face side to reinforce the neck. I am going to paint he face of the head stock black so the plugs I would use for the holes would not show. Will let you know how it turns out.


Turn key holes


Using the template I used to cut out the shape I marked for the 6 holes. Then using my drill press I drill the 10mm holes.

Friday, December 25, 2009

Rounding the back corners.


First to set the 3/16th" round over bit using scrap.


Then run the body through the set up.

Side Dots

This was one of the easier tasks


Here I have my measuring devise, thumb drill and black plastic rod.


Find the position for the hole and drill.


Now it just a matter of applying a little glue to the end of the rod, insert into the hole and trim with cutters.


After it drys I will sand and scrape them flush.

Working on the neck


The first thing I did was cut the excess mahogany of the sides with a band saw. Staying about 1/16" away from the bindings.


Next I had to create the taper on the back of the neck. From about .850" at the nut and 1.010" at the12th fret.
I used some scrape binding material as shims at the nut end until the bottom the router bit lined up at .850" mark at the nut and 1.010: at the 12th fret The I moved the neck back and forth under the bit .

And so 

Done.
Now I have to even up the sides to the bindings.


I did this by first putting a piece of masking tape down the binding. This will insure the I will still be just a bit wider than the fret board with binding. Then set up my router with a flush cut bit aliened the bearing to the binding and ran the neck through.


Then the other side.
Now I need to make a template for the head stock. I am using 1/4" furniture grade plywood.


After transposing the design to the plywood I trimmed it with a band saw then used the drum sander to finalize the shape. I will now attach this template to the head stock using two faced tape.


Using the same set up I had for sides of the neck I will run this around the template.


Here we go.


Monday, December 21, 2009

Inlays


I was going to do something more elaborate with the inlays, but seeing that I have never done inlays I decided to use the Les Paul Custom inlays on this first guitar. I am not going to put a inlay at the 1st fret. Just to be different. Who knows you may end up seeing it used for a decorative inlay in the headstock.


First I have to screw the 5/16" aluminum plates to each side of the fret board.

As you see here


Then I position the inlay on the fret board and scribe a mark around it.
I then use chalk to highlight the mark. Then I used a straight edge and my miniature router with 1/8" down cut spiral bit to route out for the inlay. To make this a little easier. I figured out the distance from the edge of the router base to the edge of the bit. I then used my micrometer to position the straight edge. Then it was just a matter of holding the straight edge with one hand and turning on the and positing the router bit inside the scored area. Which was probably the hardest part. Especially on the last couple inlays which where very narrow. After using the router I have to square up the corners. I used an X-Acto knife for this which worked great. The first inlay took a while and I actually had to do it twice as the depth of the initial route was not deep enough.


1 down 8 to go.


I repeat the process.


2 down 7 to go.


All 9 inlays ready for epoxy.


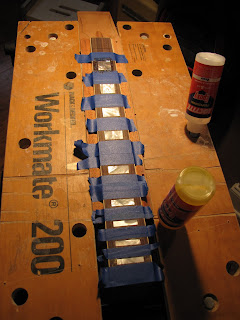
I taped off the fret slots. Using 2 part epoxy then I glued the inlay in place.
I then mixed some saw dust I saved from the fret board when I sanded the fret board to size with the epoxy and filled the small gaps around the inlay.


                                                 1 down 8 to go.

Now I will wait until the epoxy cures and start filing and sanding the inlays.


Using a file I remove most of the excess inlay and epoxy. Cleaning the file often with a wire brush.


During the process.

Almost done with the filing.


I started with a 120 grit sandpaper on the radius block and then used 220 grit. I will go over it one more time with 320 grit prior to fretting. After using my 12" radius block I noticed one spot where I needed a little mote filler. Which was a very easy fix. Taped back over the close fret slot and added a little filler. Wait till dry and re-sand.
 
 
Almost there.


After cleaning with denatured alcohol.

Thursday, December 3, 2009

Final piece of Binding


Here I have removed the tape and now I am scraping the binding flush with the top and the sides.


I use a couple different shapes.


I have the second piece scraped down enough to now put on the 3rd and final piece.


Prepared


Done


After 24 hours I removed the tape and more scraping begins.


Here I have about 75% of the scraping done I have some more sanding to do to the carved top and will finish the binding then.


Here I have done more scraping and sanding of the carved top. I am almost satisfied with the carved top.
Almost.


Here you can see a close up of one of the joints in the binding.