Wednesday, September 23, 2009

More work on the neck


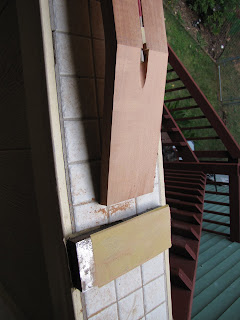
Here is the neck now after using a band-saw to cut the 18 degree angle of the headstock and the shape of the underside of the neck.


Now I will use a 1/2" piece of steel with 150 grit self adhesive sand paper to sand out the bandsaw blade marks and to bring in down to size.


Now I am almost there.


Since I am using a 2 way truss rod there is no filler strip and I want to use a truss rod cover that does not butt up against the nut I needed to make a small plug. This was done very carefully on a table saw.


Here I am dry fitting the plug. Next I will silicone in the truss rod and glue in the plug. Then I can sand the plug down flush. The head stock will be painted black so you won't be able to tell there's a plug when I am done.


Monday, September 21, 2009

Starting the fret board


First I have to cut the board to size. To do that I first marked a center line on the board.


Here you see my marked board. What I did is put tape down the sides. Then I used my drawing, old fret board that came off a Les Paul I determined the width at the nut and the 22 fret. I divided it by 2 and using my micrometer I marked out the board from the center line out. I then use a straight edge and x-acto knife to cut the tape on the mark.

I determined that I need to cut this at the 23 fret for length. Done with my table saw and miter fence.

I will be using my oscillating belt sander to grind down to size. You can see that I have also cleaned the sander so I can collect the dust and save it for filling any small gaps I may have when doing my inlay work.


Here I am finishing up.

Resting where it will soon be glued. I have to get the bindings on next.

Finishing the routing for the truss rod


What I have left to do is create the recess you see under the truss rod cover. Here I am centering a 1/2" bullnose bit. Using my fence. I used the same process for centering the bit that I used to before. Centering it by eye then running the piece in about 1/2 " and checking to see if it is centered. Once centered I ran the piece in until I hit my mark.

Here you see what it looks like after routing. I now have to use a wood chisel to square it up.
Here you see it during the carving.

Now during dry fit. A littile touching up and its done.

Truss rod routing is complete.

Wednesday, September 16, 2009

Next step

I am going to be working on the fret board next. What I am getting from Stew/Mac is a rosewood finger board, Les Paul custom pearl inlays, cream bindings and a vintage bone nut. I have to get get the fret board cut to size and glue the binding on first. Then I am going to install the double action truss rod. As you can see I am only using the Les Paul prints as a guide. No reason to put in the Les Paul style truss rod when you can use the new double action. I actually bought one with a hex nut and I am sending it back for one that uses a allen key. As the double action adjusting rod sets lower in the neck I wont have to go even deeper so the Nut driver will fit around it. The one with the allen nut won't have to have as much carving done on the neck for it be accessible. I will probably have to do a little more shaping on the head stock before I glue the fret board on. After its glued on I will level the fret board with a radius block and do the inlay work. Then I will install the frets.

On a different note I have changed my mind on the pick-ups. I just ordered a DiMarzio LiquiFire DP227 for the neck and a DiMarzio Crunch Lab DP228 for the bridge. These just came out in 2009 and are what John Petrucci is now using.

Straight from DeMarzio's web page referencing the Crunch Lab DP228:
"One thing has stayed consistent throughout John Petrucci’s long and successful career: the DiMarzio® pickups in his guitars. John has been pushing the envelope of progressive metal since the late eighties, and the new DiMarzio® Crunch Lab™ Bridge Model ensued from our most recent collaboration with John. He used it throughout Dream Theater’s tenth studio album, "Black Clouds & Silver Linings.
John swears this is the best live and studio sound he has ever had, and the name says it all - "crunch" is what it’s all about with a big, tight sound that’s neither muddy nor thin".

Tech Talk: The Crunch Lab™ is noteworthy (bad pun alert!) for what it doesn’t do - it’s not a screamer, and it’s not about thundering lows. Its physical appearance is identical to the D Sonic™, but the internal design is a lot different. It’s louder, and the highs have more depth. The lows and mids are more open, and this is crucial for playing chords with body and presence through a gained-out amp. The voicing of the pickup is also different enough to the point that John prefers the Crunch Lab™ to be installed in almost all of his guitars (including the JP Bari) with the solid bar toward the neck, regardless of the guitar’s tuning.

Referencing the LiquiFire DP227:
One thing has stayed consistent throughout John Petrucci’s long and successful career: the DiMarzio® pickups in his guitars. John has been pushing the envelope of progressive metal since the late eighties, and the DiMarzio® LiquiFire™ Neck Model resulted from our most recent collaboration with John. He used it throughout Dream Theater’s tenth studio album, "Black Clouds & Silver Linings".
John swears this is the best live and studio sound he has ever had. He wanted a neck pickup with a flowing, singing solo tone when used with a heavily overdriven amp and a clear chord sound with a clean amp setting.

Tech Talk: Since the mid 1990s, John’s neck pickup sound has been based on either the standard Air Norton™ or the custom version in his Ernie Ball® guitars. The LiquiFire™ has several significant differences. Its treble response is warmer and smoother while bass response is tighter and brighter. The total sound has a more focused voice which works equally well for highly overdriven solos and complex, clean chords.

Once those come in (from Sweetwater.com) I can think about routing out the cavities for them in the body.

Tuesday, September 15, 2009

Finishing the tenon


I need to remove the rest of the material from the tenon to the 4 degree lines marked. This is where I wish I had a Radial Arm Saw. It would make this part much easier. But I will use my table saw next to complete the 3 long edges and end of the tenon. The 4th edge is where the fret board will set. I start by setting the blade height where I have already used my router to establish the width of the tenon. Then I set the fence at 4 degrees and cleaned up what was left after using the router. This part is done at 4 degrees for the angle of the set neck. Then I use my Compound miter saw for cut to length also at 4 degrees. Then I rounded the corners with my belt sander. Then I used a sharp wood chisel to clean up the inside corners and its done. Now I am waiting on some supplies I ordered from Stew/Mac. Fret board is next.


Monday, September 14, 2009

Starting to form the tenon


I remove the bit I used for the truss rod slot and replaced it with a 5/8th" bit. I am going to slowly cut away to form the 2 outside edges of the tenon. Cutting about 1/4" at a time. Now about 75% of the material has been removed for the side cuts on the tenon. I am wishing I had a radial arm saw about now.

Routing for the truss rod


Here I have mounted my router in the table of table saw.  I am using a 7/32nds bit as per the truss rod instructions. Using the fence I set it up as close to center as I could by eye. I then ran the piece in about 1/4" then checked using my digital micrometer. After 2 small adjustment to the fence you can now see I am with in 1/10th of a millimeter from center. Close enough for me. The depth of the slot needs to be 7/16th of an inch. I ran to piece through 4 times. Cutting to a depth of 3/16th" the first pass then to 3/8" and the I check the depth with the truss rod. The top of the brass block on the truss rod needs to be flush with the top of the mahogany.

Starting the neck


First I drew out the side profile of the neck onto the blank. In doing so I noticed I could get two necks from this blank if I had it cut before starting.  I took the neck blank to Jack and had him split it. By doing so now I will be able to make two necks from this blank. Here you see a side view of the tenon and a top view of where the nut will go. And of course the center line.

The body with maple top

After removing the clamps I used my band saw to rough cut the maple leaving 1/8" or so then using my flush cut bit with bearing mounted on the bottom I routed it down to the Mahogany.
Here is the body after I routed it down to size. I used tracing paper to copy the pick-up cavities then used carbon paper to get them onto the body. You can also see the MDF I will be using to create the templates for the pick-up cavities. After consulting Jack he has advised me not to route the cavities for the pick-ups until after I have the pick-ups in hand. Just to make sure of the size I need them to be. I am now in the process of purchasing 2 Dimarzio's. So it's time to start on the neck.

Friday, September 4, 2009

Gluing on the maple top


Here I used a blue shop towel to protect the face of the maple. Then I covered the mahogany with glue and flipped it over and placed it on top of the maple top. I have center lines marked on the ends on the mahogany that have to be lined up with the joint of the book matched maple set that was glued up earlier. I started with the center beam and clamps slowly tightening and watching my marks. With all that glue it want to slide around a lot. The first clamp was hard to get on, but working each clamp slowly I was able to get it tightened and centered. Then I stared adding clamps, clamps and more clamps. I will rough cut this with my band saw and use the router to shape this down to the mahogany.

Routing the rest of the body


Here you can see I have changed bits to one with the bearing mounted on the bottom end of the bit.
I have turned the piece over and screwed the template back on the top which is now facing down. The piece of MDF you see on the top is just to protect the back of the wood. This will stay on during fabrication.
Now its just a matter of making several passes until the bearing is touching the mahogany all the way around. I now have the body is ready for the maple top to be glued to it.

Routing the body from the top side first


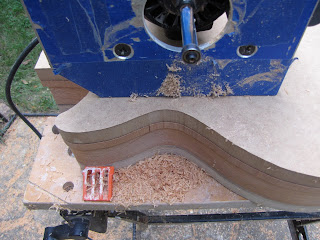
Here you see the template after it has been screwed onto the mahogany. The screws are in what will be the neck pocket and one of the pick-up cutouts so the screws are fine. I have secured it to my work bench and now you can see the beginning of the first pass. Halfway through the second pass. After I completed the 2nd pass I removed the template and I can now use the shape on the mahogany as the pattern.

Halfway through the 3rd pass and completion of 3rd pass. Now I will complete this from the other side.

Thursday, September 3, 2009

Update

I had to take my body somewhere to have the rough shape cut out as my little band-saw was not up to the task. Which has turned out to be a blessing. I had driven by a shop called Mint Hill Cabinet for years on my way to and from work. So I decided to stop in there and see what he would charge me to cut the rough shape. Low and behold when I walked in there was a dude working on a guitar. Turns out half this shop is the cabinet shop and the other half a guy named Jack uses to build and repair guitars. To make a long story shorter he cut out the rough shape for me for a fare price. After cutting the blank, he asked me what my plans were and after that he had some very good reasons how and why I need to change my plans a little. Seeing as he has been doing this for decades I am listening to his advise. So, my plans now are to go ahead and route the shape of the body, glue the maple top on. While I am doing that I am going to start on my neck. I had planed on carving the top first and making the mortes, beveling the 4 degree angle on the body. Then starting on the neck.
After talking to Jack he told me after gluing the maple top on, not to carve the top yet. I need to route out for the pick-ups only. Doing this before carving gives me a flat surface to do this on.
Then start on the neck and complete the Tenon then I can transpose the exact angle of my tenon to the body. My head is over loaded with his advise. I will be talking to him often I am sure. So now I have to get started should have a few more pictures soon.