Saturday, February 27, 2010

Making the Nut


In order to make the nut I need to put on the bridge, tail piece and tuning keys.
I first soldered a ground wire on one of the anchors for the tail and then applied a little tight bond and hammered it in the hole closest to the controls. I then glued in the other anchor for the tail piece. I then hammered in the anchors for the bridge with out glue as I will remove these after the making of the nut for final sanding and the finish.


Marking the rough out line of the nut. I will take this and remove most the stock on my belt sander and then use files to refine the shape.


Installing the tuning keys.
 
This is the rough version. I first used a Stew/Mac string spacing rule to mark the nut. Then a .010 saw to start the slots. I then used various sizes depending on with string slot I was working to finish the grooves.
 
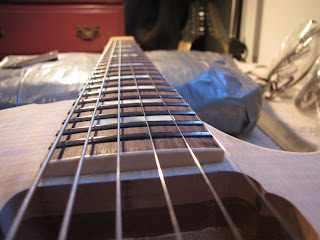
Made by placing the nut in position and stringing. Using an action gauge I cut the nut slots using different size nut files until the string has a clearance of .025 of an inch over the first fret.
 
These are the different files I used along with the string set up gauge from Stew/Mac and just a feeler gauge.


With the nut complete and action set. I have .060 of and inch at the 22nd fret for the high -E- and .070 of and inch for the Low -E-. 

Finishing the frets

 
This is what I will work with. Stick belt sander and sanding pads.


One side has a single groove.

 
The other a double. 
 
The crowning file was 300 grit. So I will use 300 grit paper to start. Then 400 and then 600 grit.
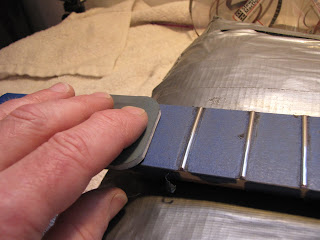
I use the single groove side for sanding the tops.

 
I use the double groove side for sanding the sides. 
I do this for every fret through every grit.

 
As well as the fret ends.

 
I then use the sanding pads staring at 1500 grit and finishing with 12000 grit.

Friday, February 12, 2010

Installing the frets

I am using Stainless Steel Jumbo fret wire. I thought about springing for the fret press 12" radius caul. But decided to use the tools I already had. A fretting hammer. Maybe the next build I will make that purchase. One thing I did buy was a good diamond fret crowning file. I have been using a standard metal fret crowing file and the diamond file saves you a lot of time as there are not as much sanding needed after using the diamond file.
The first thing I did was cut 22 pieces to length. I then had to remove the tang from the end where they over lap the binding.


Here you can see the  process. Using the tang nippers I remove the tang. I then file the little bit remaining flush.


After hammering in a few.  The hammering of frets takes practice. This is only the 2nd total fret job I have done. But it's really not that hard. I first make sure the wire is a little over bent. The wire I am using is approx 10" radius. The fret board 12". I start by placing the two end of the tang in the fret slot. I then using 1 firm strike I seat one end. I then seat the other end using 1 firm solid strike. I then hammer the center out. That allows the end of the tangs to slide side ways ever so slightly and seat them well. I am using a small bag off sand that I wrapped well with duck tape to support the neck during the hammering.


14 down 8 to go


22 frets installed and trimmed.


I am now using a 6" fret leveling file to bevel the ends.

After that I using 220 and then 320 grit adhesive sand paper on a steel bar to start with the smoothing.


I then use a steel straight edge and adjust the truss rod to get the frets as level as possible.


I then mark the top of the frets with a sharpie.  I forgot to take a picture of this. But what I did was use the 3/8" aluminum plate that was used for drilling the tail piece and bridge anchor holes. I put 320 grit self adhesive sand paper on the plate and ran it back and forth across the top of the frets until a little marker was removed from the top of all the frets.


Then using the fret crowning file I will file the top tops of the frets where the flat spots are until crowned.


While I am crowning the frets I use a rocker gauge and check as I proceed up the fret board.

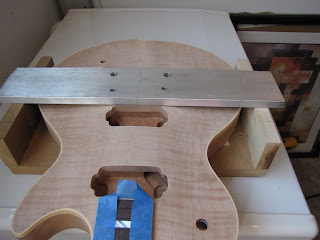
Jig for drilling the holes for the bridge and tail piece

 
Here you see the Jig I made for this. I then marked where the two holes for the bridge go. I used two faces tape to hold the body to the base. I then clamped the aluminum template to the base lining up the center line on the template to the center line on the body. I then drill out the holes. After drill the last hole and remove the template. I noticed my first serious malfunction. Evidently the body of the guitar shifted in the jig after the 3rd hole. So the 4th hole is off. Talk about being bummed. The very last serious hole I had to drill in the body.


So what I did was buy a 1/2 plug cutter. Cut out 4 plugs from scrape maple left over from the top. Glues the 4 plugs together.  No the hole I need to plug is 10.8 mm. The plug I made is 12.7mm.  As you can see i put the plug into the drill. Ran it at slow speed with 120 grit sand paper I  made it 10.8. I then glued in the plug sanded smooth and re-drilled.
 
Here you see the damage. I don't think its going to be that noticeable after staining and the tail piece in installed.